11 Sept 2011

Raspberry & Pistachio French Macarons


I literally loved to bite in these small french macaroons with a crunchy meringue shell and soft almond layer sandwiched together with pistachio and raspberry butter cream ganache. I promise, there were many bits..


The first time I got to know about french macaroons, I literally fell in love with the small cute colorful mouthfuls filled with cream. However the sad thing is that I have only managed to make them only three times since then. I remember I was really excited the first time and colored them in pink, green and brown, but the result was not as expected. Actually they turned out great when it comes to taste and texture, but the problem occured removing them from the baking sheet. The macaroons had stuck to the sheet and I had to scrape them off which made them quite crunched looking and not at all as the lovely smooth macaroons you see in pictures. It is over a year ago and they were appreciated though. The second time I dared myself to make the french macaroons again was before christmas holidays if I do not remember wrong and I "thought" I had found the perfect failproof recipe in a magazine which made them look so easy to make with step-by-step pictures. The result? Disaster. A catastrophe! I mean they could seriously not have turned out worser. They were looking like everything, but macaroons! The purple color seemed to disappear in the oven and they got cracks allover. I was sooo disappointed and squeezed them together and they went for the birds garden party (wonder if they bothered to eat them).
Finally, my third attempt on these oh so delicious french macaroons was for about over a week ago for an occassion. I challenged myself to get them right this time and reassured me a recipe from my favorite baking blog "Passion 4 Baking". This recipe was different from the two previous recipes, as it took base in the boiled syrup method. Half-sleep and tired at around 2 am midnight, I was standing in my kitchen challenging myself to make macaroons! How could it not get wrong?

It did NOT go wrong. Really. I was amazed and could breathe a sigh of relief. Some of them was not really round and the color seemed to appear more pale even though I added a lot of color, but they were all smooth and I could see no cracks and they easily came off the baking sheet. Finally, I mastered the french macaroons. But to perfection? I would say no. I will definitely need more practice to make them to perfection. A challenge I will definitely love to dare.


I love this recipe, so I am sharing it with you. I have no step-by-step pictures since I was in a hurry, but you can see them here (norwegian text). Search for 'Pure Vanilla Macarons'.


PS! These are extremely dangerous, because I ended up eating over half of them all alone. Having one bite of these, means you are addicted! Actually I forgot to bring them for the occassion (bad for them, good for me).


I n g r e d i e n t s


Makes about 30 sandwiched french macaroons


120 g egg whites (about 4)
35 g sugar
150 g almonds, finely ground
0,5 vanilla pod (or 1 tsp vanilla sugar)
150 g icing sugar
150 g sugar for syrup
0,5 dl water for syrup


PS: You can buy ready made almond flour or you can cook and scald almonds for then to ground them superfinely or you can ground them with their shell on just as they are. The last mentioned method will give a more intense almond taste.


NB! Line your baking sheet with bought greased baking paper or else you may have trouble with sticky macaroons. It is not enough to grease some regular baking paper!


Divide the egg whites equally in two bowls and set aside for atleast one hour at room temeperature, or preferably overnight


1. Combine ground almonds and icing sugar in a bowl
2. Add the egg whites (60 g) from one bowl and mix until they form a paste, set aside


3. Have the sugar and water in a saucepan and cook on high temperature until it reaches about 118C or till the sugar has dissolved (ca. 2 minutes)
4. Scrape off the beans from vanilla pod
5. Have the egg whites from bowl 2 (60 g) in a large bowl and whisk along with the vanilla beans to a soft meringue
6. Add sugar (35 g) little by little while you are whisking
7. Add carefully the sugar syrup while whisking the meringue and whisk for about 15 minutes, or
until the meringue becomes glossy
8. Mix the meringue with almond paste (the consistency of batter has not to be runny or too thick)
9. Add color as desired and fill a pastry bag with a round nozzle and press small circles (around 4 cm) on a lined baking sheet


Let them rest for about 30 minutes (this makes them become more glossy and there are less chances for developing cracks)


* Use an extra baking sheet below the baking sheet with macaroons while baking them


Bake in the middle of oven at 160 C / 320 F for about 12 - 18 minutes


Let cool on the baking sheet for atleast 30 minutes or preferably overnight to prevent them from sticking to the sheet


Sandwich the cooled french macaroons together with ganache using a pastry bag and serve!


* You can use buttercream ganache to sandwich the french macaroons together or you can use sieved jam of choice. There are a lot of different and delicious ganache recipes to be found on google.


Buttercream Ganache


75 g butter
75 g icing sugar
1-2 tbsp milk
green and pink coloring / coloring of choice
30 g pistachio nuts, finely ground
30 g raspberry jam, sieved
or
flavoring of choice


(I added finely ground pistachio nuts and green coloring for half of the macaroons and sieved raspberry jam and pink coloring to rest of them who were pink)


1. Beat the butter until it becomes soft and creamy
2. Add the icing sugar and continiue beating until it becomes fluffy and pale in color
3. Add a little milk if required for smoother consistency
4. Add coloring and flavoring of choice


9 Sept 2011

Filled Chocolate Hearts ~ The Daring Bakers Challenge August 2011


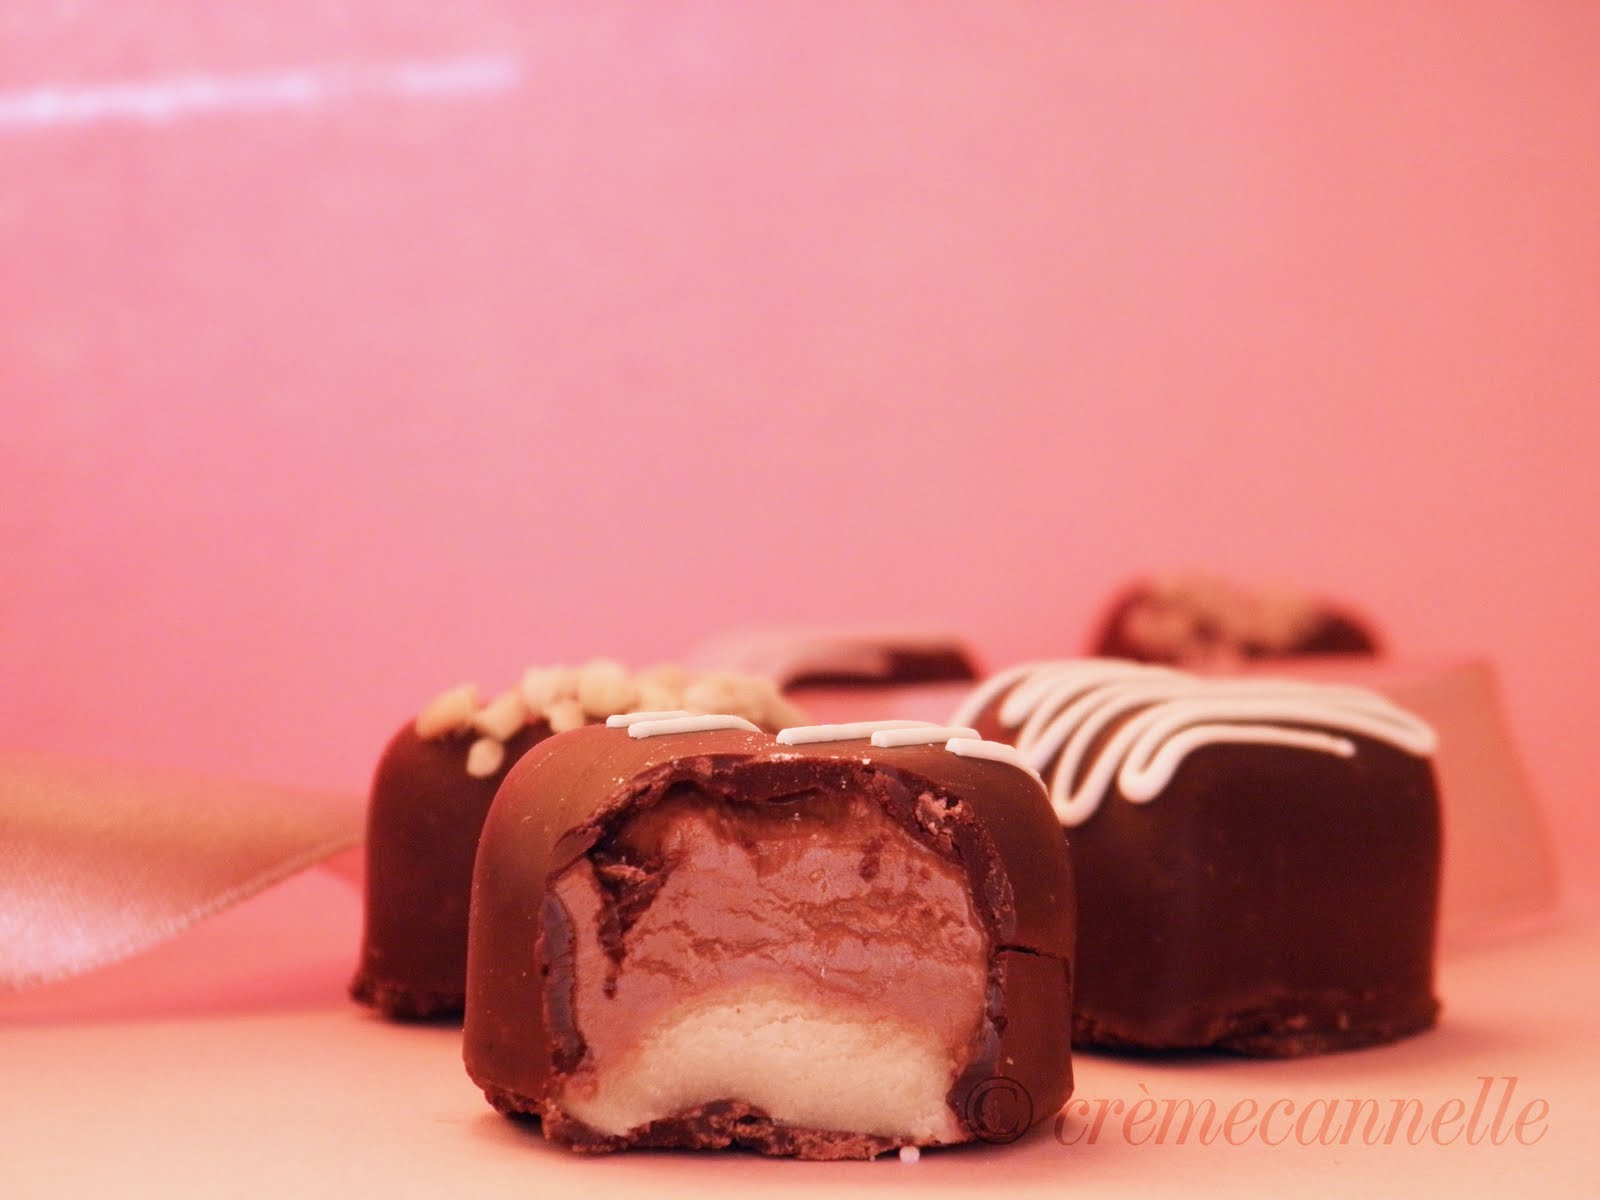
Dark chocolate heart bonbons filled with marzipan & nougat, salted caramel and coconut. Indulge in chocolate!


This months daring bakers challenge was quite fun and different. We were supposed to make candies; chocolatey and non-chocolatey. And I can not remember to have made any thing near to candies since I was in my teenagers and loved to experiment with caramels and stuff. I was really excited at first and decided to make french nougat or fudge for the non-chocolate candies and chocolate bonbons filled with marzipan, raspberry jelly and nougat for the chocolate candies. But as expected I ran
out of time at the end of august and keeping too many balls in the air, I ended up with making only chocolate filled bonbons with three different fillings. I must admit myself, I am pretty much satisfied with the results and tempering chocolate for the very first time in life (even hearing the term for first time), it did not turn out wrong (although I would want them more shiny and smooth at them bottom)!


These beautiful chocolate heart bonbons were garnished with royal icing and almonds to give them a more professional and elegant look, for then to be packed into a black selfmade giftbox with my very own logo on and wrapped in pale pink ribbon to finish a elegant look. A cute cardnote with text was attached on.


Most of the recipes in here are from the daringkitchen and I have just copied and pasted, perhaps halfed some of the recipe. Although the marzipan and nougat filled
bonbons is my own recipe. I know it seems like a lot of text and instructions, but it is not as difficult as it looks like when you have read through it all. Homemade chocolates, bonbons or any other eatable gifts are a pleasure to give and a joy to receive.


How to temper chocolate using the “seeding” method


Tempering Ranges:


Celsius
Dark: 45°C-50°C > 27°C > 32°C
Milk: 45°C > 27°C > 30°C
White: 45°C > 27°C > 29°C


Fahrenheit
Dark: 113°F-122°F > 80.6°F > 89.6°F
Milk: 113°F > 80.6°F > 86°F
White: 113°F > 80.6°F > 84.2°F


Chocolate is melted and heated until it reaches 45°C / 113°F. Tempered un-melted chocolate is then stirred and melted in until it brings the temperature down to 27°C/80.6°F. It is then put back over heat and brought up to its working temperature of 32°C/30°C/29°C /// 89.6°F/86°F/84.2°F depending on the chocolate you’re using. It is now ready for using in molds, dipping and coating.


• Finely chop chocolate if in bar/slab form (about the size of almonds).
• Place about ⅔ of the chocolate in a heatproof bowl
• Set aside ⅓ of the chocolate pieces
• Place bowl over a saucepan of simmering water (make sure the bowl does not touch the water)
Tip: Make sure that your bowl fits snuggly into the saucepan so that there’s no chance of steam forming droplets that may fall into your chocolate. If water gets into your chocolate it will seize!
• Using a rubber spatula, gently stir the chocolate so that it melts evenly
• Once it’s melted, keep an eye on the thermometer, as soon as it reaches 45°C / 113°F remove from heat (between 45°C-50°C / 113°F-122°F for dark chocolate)
• Add small amounts of the remaining ⅓ un-melted chocolate (seeds) and stir in to melt
• Continue to add small additions of chocolate until you’ve brought the chocolate down to 27°C/80.6°F (You can bring the dark chocolate down to between 80°F and 82°F)
• Put it back on the double boiler and bring the temperature back up until it reaches its working temperature of the chocolate (milk, dark or white) as seen in the above chart. (32°C/89.6°F for dark, 30°C/86°F for milk and 29°C/84.2°F for white)
• If you still have a few un-melted bits of chocolate, put the bowl back over the simmering water, stirring gently and watching the thermometer constantly.
• IMPORTANT: You really need to keep an eye on the temperature so that it doesn’t go over its working temperature


It’s now tempered and ready to use


Tip: Another way of adding the "seed" is by dropping in one large chunk of tempered chocolate (the seed). That way you only need to fish out one piece of unmelted chocoalte and don't need to fish out several small bits of unmelted chocolate once the chocolate has reached temper.


How to make filled chocolate with molds


Tempered Chocolate
Various Colored Cocoa Butters (optional)
OR Food Grade Cocoa Butter colored with powdered food coloring


Other Equipment:

A small brush
Chocolate molds
A Ladle
Bench or plastic scraper
OR
A small brush or spoon


Directions:


1. If using colored cocoa butter and plastic molds, paint designs at the bottom of the wells in each mold. Let dry. You can also use lustre dusts mixed with a bit of extract, instead of colored cocoa butters for a nice sheen. Let painted molds dry.


2. When coating the molds with the tempered chocolate, I like to do it how the chocolate pro’s do it (much faster and a lot less tedious). While holding mold over bowl of tempered chocolate, take a nice ladle of the chocolate and pour over the mold, making sure it cover and fills every well. Knock the mold a few times against a flat surface to get rid of air bubbles, then turn the mold upside down over the bowl of chocolate, and knock out the excess chocolate. Turn right side up and drag a bench or plastic scraper across so all the chocolate in between the wells is scraped off cleanly, leaving you with only chocolate filled wells. Put in the fridge to set, about 5 to 10 minutes. Alternatively, you could take a small brush and paint the tempered chocolate into each mold, or spoon it in if you’d like.


3. Remove from refrigerator and fill each well with the filling of your choice. Again take a ladle of chocolate and pour it on top of the filled chocolate wells, knocking against a flat surface to settle it in. Scrape excess chocolate off the mold with the bench scraper then refrigerate until set.


4. When set, pop your beautiful filled chocolates out of each well and enjoy!


Caramel Filled Chocolate Bonbons


Makes about 20 - 25 medium bonbons


Dark or milk chocolate melted, preferably tempered, about 1 lb / 450g
1 cup (225g / 8oz) Granulated White Sugar
1/2 cup (125ml / 4 fluid oz) Light Corn Syrup
1/2 cup (125ml / 4 fluid oz) Water
4 Tbsp (60g / 2 oz) Unsalted Butter
2 Tbsp (30ml / 1 fluid oz) Heavy Cream
1/4 cup (60ml / 2 fluid oz) Passion Fruit Puree
1/2 Tbsp salt


Equipment

2 or 3 quart, heavy-bottomed pot
Candy thermometer
Whisk


Directions:


1. Place the sugar, corn syrup and water in a medium saucepan.
2. Set over medium-high heat and stir to combine.
3. Bring the mixture to a boil and cook until dark amber in color 310°F-315°F / 155°C-158°C, about 5 minutes.
4. Use a pastry brush, dipped in water, to wash down sides of pan to prevent crystallization as the mixture boils.
5. Remove saucepan from the heat and gradually whisk in the passion fruit puree, heavy cream and butter.
6. Transfer to a medium bowl and let cool.
7. Transfer cooled caramel to a pastry bag fitted with a medium plain tip or a squeeze bottle.
8. Coat the molds with chocolate using the method mentioned above.
9. Fill chocolate coated molds with caramel. You can use a spoon too but it’s less messy and goes a lot quicker with either of the two aforementioned methods.
10. Finish off with a layer of chocolate as mentioned in the method above for making filled chocolates with molds
11. Once fully set, carefully knock the chocolates out of the mold


Marzipan and Nougat filled bonbons


Makes about 10 bonbons


150 g marzipan
50 g nougat


1. Follow the first three steps on "How to make filled chocolate with molds"
2. Fill 3/4 parts with nougat and press down a piece of marzipan so it covers the mould hole
3. Follow from step 3 on "How to make filled chocolate with molds"


"Bounty" Coconut Filled bonbons


50 ml heavy cream
150 g sugar
125 g heavy cream flavored margarine (you can substitute it with regular margarine)
125 g dessicated coconut
75 g dark chocolate
1 Tbsp oil (for chocolate)


1. Put cream, sugar and diced margarine in a saucepan and heat everything until it comes to a boil
and let boil for about 5 minutes
2. Remove from heat and stir in coconut
3. Line rectangular baking pan with a baking paper and pour the mass inside. Leave in the fridge for atleast 2 hours or overnight
4. You can cut it in cubes and dip them in chocolate the next day, or you can take a small spoonful of coconut mass and press
it into the moulded chocolate holes and follow step 3 and 4 on "How to make filled chocolate with molds"


A great gift for any occassion..


26 Aug 2011

Apple & Pear Cinnamon Turnovers


Imagine biting into a crispy exterior with soft, sweet and hot filling inside accompanied with vanilla ice cream and chocolate sauce. Almost too good to be so simple!

I love baked apples and pears. There is something that makes them so delicious when they have been fried or baked and they makes great company to ice cream or any creamy thing at all. These apple turnovers are usually made with apples only, but I wanted to twist them a little and combined apple and pear which goes great together with a dash of cinnamon. Cinnamon is a lovely spice with a unique taste that goes perfectly with apples and almost anything if you ask me.  


These apple & pear turovers are almost as delicious as the one you get in Mc Donalds and are served in 1 hour only if you are using freezed pastry dough. 15 minutes cooking, 20 minutes baking and ready to serve fresh from the oven!


Makes about 10 pastries

Ingredients


250 g puff pastry


1. Roll out and divide the pastry dough in 10 rectangular or triangle equal sized peices


Filling


1 apple
1 pear
1 tbsp butter
45 g sugar
1 tsp cinnamon
1 tbsp lemon juice


1. Peel and core the fruits and cut them into small cubes


2. Melt the butter in a medium sized sauce pan


3. Add the diced apples, pears, sugar, cinnamon and lemon juice


4. Let cook over medium heat for about 15 minutes


5. Set aside and allow to cool for 10 minutes

6. Have a spoonful of filling on each pastry rectangular or triangle


2. Turn over the dough so that it covers the filling and seal the edges by pressing a fork all aorund


3. Have the pastries on a baking sheet and brush with beaten egg


Bake in a hot oven at 220C for about 20 minutes or until golden brown in color


22 Aug 2011

Oreo Cheesecake


If you love oreo cookies and cheese cake, you would not get enough of this cake which is a four layered pure  pleasure for your palate. Oreo cookies bottom, followed by a layer of cheese cake and chocolate mousse topped with whipped cream and chocolate sauce.


I have for long been wanting to make this popular oreo cheese cake that has been loved and hated by a numerous of people. The love hate relation is based on the love for oreo cookies and chocolate, while the hate is for the cake being too mighty. For some people one piece is more than enough, while for other sweet lovers like me, we would eat till we will get sick up to the neck (this is actually what happened to me after a over-eating of this cake yesterday).

First time I had this cake was at my sisters house, and I loved it. Ever since then I have noted it down in my mind that sooner ot later I must make this cake. I had stored some packets of oreo cookies in the cabinet for a while now and decided to make it on saturday so I could bring it along to my sisters house were we all were invited for dinner. This cake was literally loved by both young and older ones, and I am definitely going to make this again.

PS! If you want this cake a bit more "down to earth", you may use half recipe of chocolate mousse in the cake which will give a thinner layer of mousse and result in a less mighty cake which can be enjoyed by everyone.


Makes about 10 pieces

You will need:

A spring form, about 24 cm


I n g r e d i e n t s


Bottom

450 g oreo cookies

100 g butter, melted


1. Crush 3/4 parts of the oreo cookies to fine crumbs (set aside the remaining 1/4 part oreo cookies)
2. Melt the butter and add to the oreo crumbs and mix until combined
3. Press the crumbs evenly in the spring form


Cheese Cake Layer


200 g cream cheese, natural
2,5 dl icing sugar
2,5 tbsp sugar
3,5 dl cream, whipped


8 oreo cookies


1. Beat the cream cheese and icing sugar until light and creamy


2. Add sugar
3. Fold in half of the wipped cream (1,75 dl)


4. Mix until you get a smooth and creamy batter


5. Spread the cheese cake layer over the oreo cookies bottom and sprinkle with roughly chopped oreo cookies


Let cool in fridge for about 1 hour


Chocolate Mousse Layer


150 g chocolate, dark (high quality)
1,5 tbsp icing sugar
1 egg yolk
2 dl cream, whipped


1. Melt the chocolate in a bowl over hot water bath (preferabely over a pan)
2. Add the icing sugar and egg yolk


3. Beat heavily (still over the heat) using a whisk or electic mixer until creamy and fluffy


4. Let cool a little, and fold in the whipped cream


5. Spread the chocolate mousse layer on top of the cream cheese layer


Top Cream Layer


1, 75 dl cream, whipped


chocolate sauce
oreo cookies


1. Use the half remaining whipped cream from cheese cake layer and spread it evenly on top
2. Drizzle any good quality chocolate topping / sauce over the cream layer and garnish with some half cut oreo cookies


Let cool in fridge, preferabely overnight or atleast for 2 hours


A bite of oreo cheesecake.. so yummylicious!