29 Jan 2012

French Vanilla Macarons


Words alone can not describe these French petit colorful eye candies. One bite of this Vanilla Macaron and you are obsessed. Pure pleasure!


I love French macarons! These beautiful eye candies are my new obsession now. I think I am affected by the French macaron virus. I am kind of addicted. I want to achieve perfect looking, great tasting macarons. I am dreaming about them, and I have them in my mind all the time. I have long been wanting to find a recipe that will make really good macarons, and the times I have actually got a pretty good macaron shell, they have been stuck to the baking sheet or they have just not turned out as they should. Internet is full of recipes, you have the French meringue method, you have the Italian meringue method, everyone says different things, some say this works, others say the other works, and so on. It is really confusing. So I decided to search for a good French macaron book, but that too seemed to turn into a torture. Way too many books! So, finally, a book with almost only good responses and success stories, I went for the "Mad About Macarons!" by Jill Colonna. And I was not let down. I love the book and it uses the French meringue method which is so much easier (according to me). The book has some great pictures, flavor combinations and other tips. The only thing I can pick on is that she uses the same basic recipe for all the recipes and one filling recipe which is varying in color and flavors. But all in all, it is a fantastic book, because..


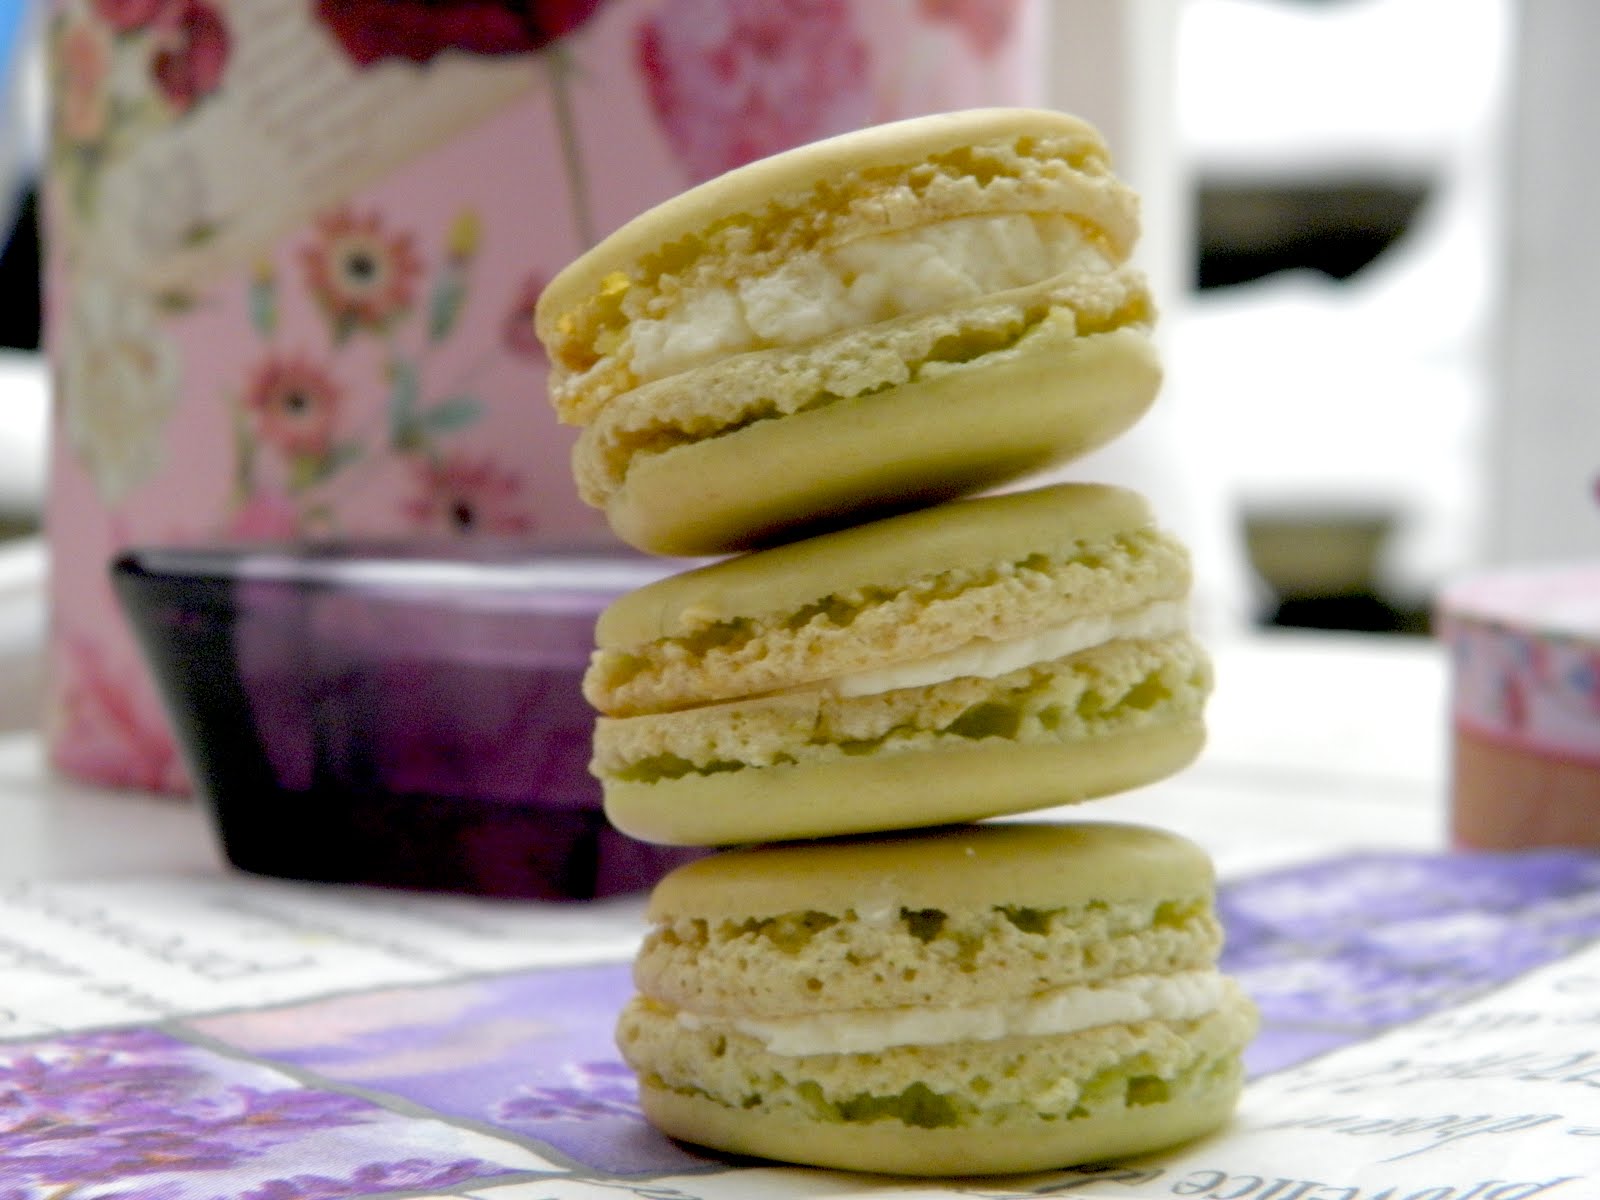
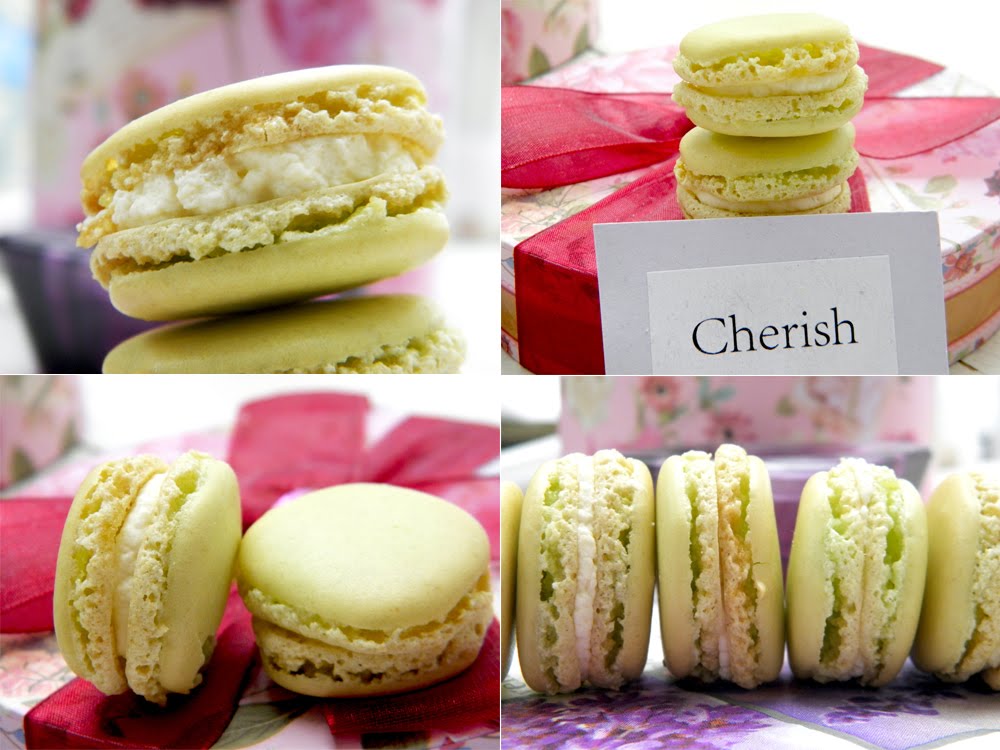
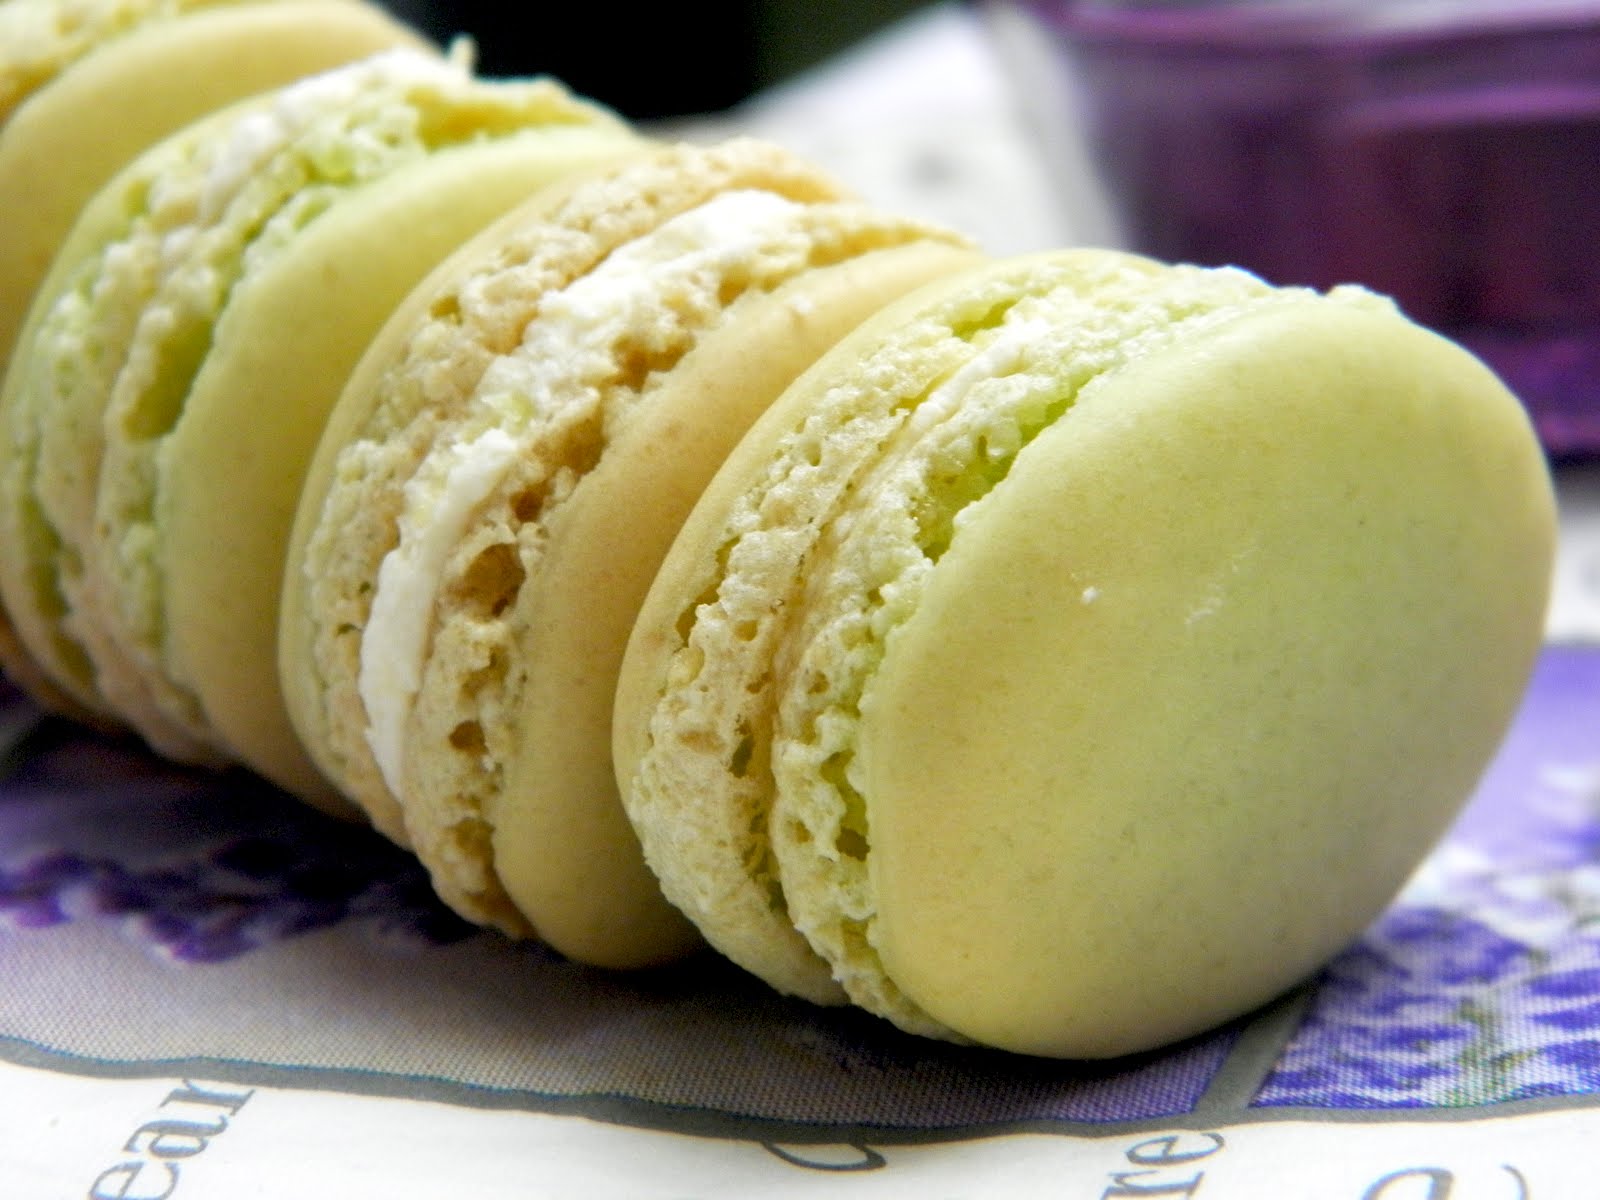
Finally! Finally, for the very first time I have succeed with achieving a really good French macaron. A French macaron with a good shell, a soft interior and a macaron with feet or "pied" as it is called. The last mentioned is one difficult and tricky step to achieve successfully. Last third time I made my macarons, the feet raised up so beautifully, for then to start flowing on the sides, and that ruined all the macarons. A real disappointment. My second last attempt was not any success either, the macarons blowed up and were kind of wobbly. They looked awful, but tasted delicious. The two mentioned macaron attempts were both based on the Italian meringue method, were you boil sugar syrup and add it in the meringue. It is quite difficult to work with it if you do not have a standing mixer or a person that is helping you. I have succeed with the Italian meringue method once, and the macarons turned out really good. You can see the recipe and photos here. I received the book "Mad About Macarons!" last week, and I had been aging my egg whites for 4-5 days in the fridge. So, on Friday it was my big day. I was going to try my fifth or sixth attempt on the French macarons, hoping to get beautiful and pretty macarons, the way they are supposed to be. I followed the recipe exactly, watched Jill Colonna's video, and I had all the tips I have read here and there in mind. I made the batter, piped the macarons on the sheet, let them dry for about an hour and then finally,in the oven. I was so excited! They raised up beautifully in the oven, but they started to turn brown very quickly, maybe it was the convection function?! They got some pretty feet or pied and they stayed as they were! I was relieved. My French macarons turned out so good (looking apart from the slight browning on top). I was so glad that I got them right. But there is one thing I have to work with, and that is the shape of the macarons. I have never succeed to get them perfectly round in any of my attempts. I guess I need some practice, and I need to find out proper technique for piping them out.


I have put some more egg whites in the fridge for aging, because I have to make a new batch. My older sister had never heard about or seen the French macarons before, and when I served her on Saturday, she was addicted! "They are so good!!" she said. And the macarons were gone with the wind!

These macarons are sandwiched or paired together with vanilla crème chantilly. I did not have time to make the proper filling, but even chantilly cream is so delicious in these macarons!

I am not giving out the recipe yet, I have to try some more attempts to see if they will keep the good result each time. Till then, enjoy the photos!

J'aime les macarons <3

A bite of the very delicious French macaron with Vanilla Chantilly Cream.. Mmmmm


The green macarons are so pretty to the pink..


Si beau!


Stack of macarons..


Cherish!

26 Jan 2012

Luscious Carrot Cake


Can you resist a piece of this mouth watering luscious and flavorful spicy carrot cake topped with a thick layer of cream cheese frosting? Not so easy!

I have not been able to post up much the last few weeks. There are many reasons for that, among them the birth of a lovely nephew, family gathering and upcoming exam. It is not that I have not baked anything during these times, actually I have made a lot of yummilicious stuff. The wonderful Marzipan Cakes in portion size with sponge cake layer, almond meringue layer, chocolate cream, success cream, apple jam and whipped cream for my nephews function. They were exclusive and delicious, loved by everyone. I also baked an lemon meringue tart for the occasion. And I had a disaster also; another failed try on french macarons, but they tasted delicious! Well, the only reason I do not have photos, is the short short days of Norway and I forgot to bring my camera to the function. It has been snowing a lot here since last Saturday, so lovely and romantic to see all the white untouched snow laying so perfectly as far as the eye could see. Well, now over to this Luscious Carrot Cake!


Some recipes are almost perfect and sometimes you do not want to share them with anyone, keeping them secretly hidden in your recipe book. But as they say, sharing is caring and giving out your secret recipes can spread joy and let others enjoy the beautiful tastes of baked goodies. This recipe of carrot cake is also one of my secret recipes which I have decided to share with you.

This is definitely the best carrot cake recipe I know of. The first time I ever made a carrot cake was using this recipe. From that time this amazing cake have been a favorite cake of all people at home and everytime I bake it, it's gone with the wind. So moist, so flavorful of all the good spices and the cream cheese frosting on top, this is just the best cake!

I actually found it on a norwegian fashion website were they regularly adds recipe, and they had this carrot cake as the weekly recipe. There must have been something in the recipe that attracted me so much (maybe the spices or my love for cinnamon) that I really wanted to try it out.
I have tried some other recipes of carrot cake too, but none of them convinced me and the cake turned out more sticky and not moist at all.

The best thing with carrot cake is that the flavors and texture is developed and enhanced for as long you let it rest. The cake is amazing freshly baked, but even more amazing and moist the day after, so you can with benefit bake the cake the day before.


Makes about 24 pieces

I n g r e d i e n t s

3 eggs
3 dl sugar
3 dl allpurpose flour
1,5 tsp baking soda
0,5 tsp baking powder
1,5 tsp vanilla sugar
1,5 tsp cinnamon, ground
1,5 tsp cardamom, ground
3/4 tsp ginger, powdered
3/4 tsp muscat nut, ground
1,5 dl corn oil (or other oil with neutral taste)
6,5 dl carrots


Grease an baking tray about 20 x 30 cm (you can use a a little larger also)


1. Combine all the dry ingredients (flour, baking soda, baking powder, spices, vanilla sugar) in a medium sized bowl


2. Combine well using a hand whisk for about 1 minute


3. Have the eggs and sugar in another bowl


4. Whisk egg and sugar until thick and fluffy (3 minutes) using a electric mixer


5. Stir in the dry ingredients


6. Until just combined


7. Add oil, mix for about 20 seconds


8. Add shredded carrots


9. Mix them in until just combined, a few seconds on low speed


10. Pour the batter in the prepared tin


Bake in a moderately hot oven at 175 C in the lowest slot for about 30 – 40 minutes or until firm to the touch

Let cool completely in the baking tray


Cream Cheese Frosting

150 g cream cheese, natural
90 g butter
3 ts vanilla sugar
ca. 6 dl icing sugar
lemon juice


1. Cut the butter in cubes and have them in a medium-small bowl along with the cream cheese


2. Beat the butter and cream cheese until creamy and fluffy


3. Add vanilla sugar and sift in half of the icing sugar


4. Beat until it becomes nice and fluffy


5. Add gradually more icing sugar (you do not need to add all of it, just add that much so you get the right consistency and as sweet as you want it) Taste with a few drops of lemon juice (Love the frosting, yummy!)


6. Spread evenly on the cooled carrot cake


Let rest in the fridge until the frosting gets a bit firm


Luscious..


and spicy


Ready to be enjoyed!

15 Jan 2012

Kids Brownie Pops ~ Winter Workshop # 3


Yet another workshop with my little cutie pies. This time Kids Brownie Pops, the very easy way. Delicious brownies made into appealing lollipops for toddlers.

I have become an aunt yet again. This time for a lovely nephew. I love babies, they are so small and soft, to eat up! Since my sister has been busy with the newbie my two cutie pies have been spending a few days at our house. It has been great time, kids are such cute creations, they keep you busy all the time. Anyways, I made some brownies and blondies on Thursday. The plan was actually to make an apple cake, but for some wierd kind of reason my younger sister started to scream for brownies (even though she was not going to eat since she had a lot of chocolate) and I had to go for it preventing more trouble.


The next day when my nieces arrived in the early morning, I thought it would be nice to make some pops of the left over brownies. I wanted to make an good icing to mix with the brownies, but ended up using icing sugar with cocoa powder and some pearl sugar for garnish. We did not have a lot of time and the kitchen was busy for dinner preparation. These brownie pops are so easy and made in seconds. They remain the same in taste (I prefer the normal brownies, but kids love these), but have a new and more exciting lollipop shape for the kids. My oldest niece loved to roll them to round balls and roll them in pearl sugar. She was also very excited with the photo shooting afterwards. Moments of joy!


Yesterday, on the 14th of January, I decided to make something french, petit choux (choux à la crème) also known as cream puffs or profiteroles. I have only made it once before a few years ago I think and they were not really successful. So this was my second attempt and I needed some helping hands this time; the hand force of my mom and sister (I did not have any energy in my arm to beat the dough with the wooden spoon, very tough job). The petit choux wreath turned out fantastic. I filled it with strawberry jam, whipped vanilla cream and garnished it with melted chocolate and blanched chopped almonds. It was an success! My brother in-law loved it (told me to make it again for the newbies function next weekend) and so did everyone else. Actually it was gone with the wind and everyone did not get a piece of it, I barely had a chance to taste it myself, let alone take a photo. I will post up the recipe some time when I make it again.

And

I just have to share the amazing night and sunset of the 14th January. The whole sky was covered with a blanket of stars and the moon was shining so bright and clear in the darkness of night. The sunset of the 14th was even more amazing and it lasted for about an hour. What artistically painting with the bright pink, purple and bluish colors. Far somewhere it was a line of intense orange color which looked like fire in a jungle. Magical! I was looking long at the beautiful creation of God. I do not have words enough to describe, so I am posting up two photos of the many I took.


Okay, here is the easy brownie pop recipe, just use whatever you have available of garnish and stuff. There are no limitations. Let your and the kids imagination run!

Makes about 15 pops

15 pieces of brownies (recipe here)
4 tbsp icing sugar
1 tsp cocoa powder
pearl sugar
15 wooden sticks


1. Crumble the brownies and have them in a medium sized bowl
2. Have the icing sugar and cocoa powder in a small bowl, stir hot water, little at time till it forms an thick paste
3. Mix in the icing sugar with the brownie crumbles
4. Roll round balls
5. Have the sugar pearls in a bowl and roll each brownie pop until covered
6. Stick a wooden stick in each ball

Ready to serve for the kids!

Brownie pops..


for kids


These will make..


all the kids happy!

11 Jan 2012

Salty Chocolate Marshmallow Cookies


Chocolate and salt. A winner combination of flavors. These cookies with melting marshmallows are rolled in crushed almonds and drizzled with chocolate.


Another Passion4Baking treat. I just had to make these S'mores Cookies the day I saw the recipe up on my favorite blog. And I had a packet of marshmallows in the cabinet which I could finally make use of. These cookies looked yummilicious; almond coated chocolate crust with melting marshmallows inside and I tell you they turned out delicious, I just loved the slightly salty and sweet combination of chocolate and salt (I am weak for salty-sweet stuff). The taste was great and my little brother loved them too, so he ended up eating over half of them! The only thing that did not go right was the marshmallows. They were over-cooked and turned into something hard crispy, but overall they did not ruin the cookies. So next time I will make these cookies without the marshmallows.


For step-by-step photos, check here

Makes about 12 - 15 cookies

I n g r e d i e n t s

100 g all-purpose flour
85 g sugar
40 g cocoa powder
1/4 tsp baking soda
1/2 tsp salt
106 g butter, softened at room temperature


Filling and coating

1/2 egg white
25 g almonds or hazelnuts, finely chopped
25 g marshmallows, mini
25 g chocolate

Prepare a baking sheet with parchment or waxed paper

1. Combine flour, sugar, cocoa powder, baking soda and salt in a bowl and mix together for about 1-2 minutes
2. Add the soft butter and beat until all the ingredients are well blended and forms like a dough
3. Form a ball, wrap in plastic and let sit in refrigerator for 30 minutes

After 30 minutes

4. Divide the dough in 12-15 equal sized balls (if you want to skip the marshmallows, you can jump to step 6)
5. Flatten each ball and add two to three mini marshmallows in each, wrap around so the dough covers the marshmallows and roll them up as a ball
6. Dip the balls in egg white
7. Roll in the chopped nuts so they cover the ball
8. Have the coated balls on the prepared baking sheet

Bake at 175C in the middle of the oven for about 12-15 minutes (they are supposed to crack open so you can see the melting marshmallows)

Melt the chocolate and drizzle over with a spoon or fork while they are still warm

Mmm.. ready to enjoy!


Chocolatey and salty..


So good!