23 Oct 2010

Baked Apple with Cinnamon Liquor


Yesterday when I was baking this luxury apple cake I came to invent an alcohol-free apple and cinnamon liquor which is delicious. And it is so easy to make, it actually makes itself and while baking apple cake you can get both, the cake and liquor done in same process.
What actually happens when you cut apples in slices and coat them in cinnamon and sugar is that the longer you let these apples stand in the mixture the more liquid will make up. The sugar dissolves with the natural water of apples and the cinnamon and form into a syrup-like liquid. This liquid has top notes of rich and strong flavor of cinnamon and mid notes of sweetness from the sugar. The under notes of apple flavor completes this delicious tasting liquor. You may use it cold or warm to any dessert, cake or drink you like which goes well with cinnamon flavor.


Makes about 1 dl 

I n g r e d i e n t s

5 large apples, peeled and cut in thin slices
1,5 tbsp ground cinnamon 
12 tbsp sugar

1. Peel and cut the apples into thin slices
2. In a large bowl mix apples with ground cinnamon and sugar
3. Let stand for at least half an hour
4. Strain and keep it in a bottle or jar

Note! The longer you let the apples stand in the mixture, the more richer and stronger flavors will be developed. Even if you strain the liquor and then let it stand for some days, the flavors will develop stronger and get richer.


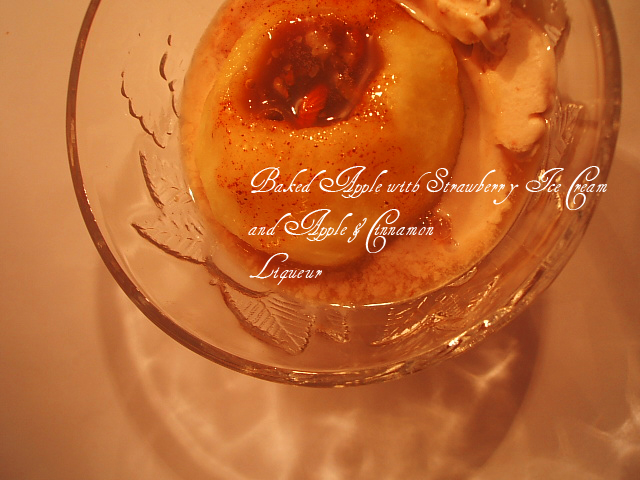
I poured my apple & cinnamon liquor on microwave baked apple with raisins and almonds which I had with strawberry ice cream. Delicious!

Microwave Baked Apple with Ice Cream and Apple & Cinnamon Liquor

Makes 1 portion

I n g r e d i e n t s

1 apple
2 tsp raisins
2-3 almonds
1 tsp brown sugar

25-50 g ice cream (any flavor you would like) or
same quantity vanilla sauce

1. Peel and core the apple, make sure you do not make hole on the bottom
2. Mix brown sugar, raisins and crushed almonds and stuff the apple
3. Place the apple in a bowl with high edges and cover with a lid
4. Put the microwave on full effect for about 1-1 1/2 minutes
5. In a bowl or plate arrange some ice cream (vanilla sauce), put the apple on the top, pour the remaining sauce on the apple from the bowl and pour cold apple & cinnamon liquor on the top

Be creative, use it with whatever you feel like. You can even put some drops in spice cake as a essence or extract.

22 Oct 2010

Luxury Apple Cake with Marzipan


My neighbour girl asked me to bake an big apple cake today as they were expecting a lot of guests. About 30 people! (I hope this cake was enough, I doubled the recipe) And as I am always ready for baking anytime, she brought me the ingredients I needed and I used an exclusive recipe that I found in the same old book which I always talks so good about. This recipe is really delicious and gives a really moist, soft and light cake. For a more luxury cake I love to add grated marzipan to the cake right before I put on the sugar and cinnamon coated apples. The marzipan brings this apple cake to the perfectness.


Since I had to give the cake to my neighbour girl as it was, I could not cut it to show the texture and softness of this cake. A piece of this freshly baked luxury apple cake along with a spoonful of ice cream, whipped cream or vanilla sauce is heavenly!
The recipe for this lovely apple cake has been posted before here, long time back, actually just over 2 years ago and the marzipan is not added there. What you do if you would like the luxury version of this cake is to sprinkle about 50 g grated marzipan all over the cake right before you put on the apples. Make sure the apples cover the marzipan or else it will get dry and loose the moistness. 


Recipe, Delicious Apple Cake

21 Oct 2010

Toblerone Cupcakes


I do not like baking cupcakes. And there is a reason for that, which is that umm, I am not pretty good at baking them. I have tried different recipes through the years, but I just can not get them right. It is the same old result, right in the middle of the tree; not bad, not the best, but good in taste and fully edible. My little sister always ask me to bake chocolate chip cup cakes and I am always like "nooo, not cupcakes! Anything else". So everytime I actually bakes cupcakes now, I try a different recipe everytime to see if there is something wrong with me or the cupcake recipes.


So, today as I was craving for something sweet for my evening tea I decided to make cupcakes. They are easy to make and they are ready in few minutes, the two only plus reasons for cupcakes in my book. My sister bought cupcake forms that were really high on the sides and with a stronger quality and her cupcake turned really delicious, even the texture was perfect. So maybe I should invest in some good cupcake forms to check the difference  next time. 
I tried to bake american chocolate muffins and they turned out great both in taste and texture, but I guess there is a difference in cupcakes and muffins. Actually I can remember the first time I tried this chocolate chip cupcakes recipe from Foodbeam, they turned out just as store-bought. Everyone told me that! But the next times I tried to bake them again, I never got the same perfect result.


This recipe I used today is from an old recipe booklet, the small ones that used to follow the home magazine back in time. My mom told me this recipe is quite good so this is the second time I tried it today. Last time I was lucky enough to mess with the recipe as I totally misunderstood what it said. This time I followed it right and I added som crushed toblerone chocolate in half of the cupcakes and in the rest half I did put sugar and cinnamon coated apple bites and some grated marzipan. The apple ones turned out really moist and soft and had a great taste while the toblerone ones were a bit dryer in texture, but they tasted good.


I would be really thankful if anyone out there has a great cupcakes recipe which is perfect would share it!


Makes about 20 small cupcakes
calories each cupcake ~ 130

I n g r e d i e n t s

100 g butter or margarine, melted
1 1/2 dl sugar
2 egg (room temp.)
2 1/2 dl all-purpose flour
1 ts baking powder
1/2 dl heavy cream (or milk)

Filling

Add whatever you like: jams, chocolate chips, apples, fruits, nuts etc.

1. In a large bowl, add sugar and pour melted butter
2. Stir or whisk for a few minutes until pale in color
3. Add the eggs, one at a time and whip heavily between each egg
4. Sift together flour and baking powder, fold in 
5. Add the cream and stir until just combined
6. Mix in filling of your choice or add them after dividing the batter in cupcake forms
7. Fill the cupcake forms about 1/3 full and add filling now if you want

Bake in a moderately hot oven at 175C for about 12-15 minutes in the middle in oven until slightly golden brown, pierce to check if the pin comes out dry they are ready

18 Oct 2010

Drömmar (Dreams)


Yes, give me more dreams! Becuase these dreams are the best. They are perfect. And they would never give you any nightmare. And the best thing is that you can choose to have as many dreams as you want! Sweet, crunchy dreams that literally melts in your mouth. Who needs other dreams when you have these?
Words are not enough to describe these amazing swedish dreams! You have to let these dreams melt on your tongue to tell how beautiful each dream was. Yes, these lovely cookies literally lives up to their name. One of the best cookies ever!


I could make these any day. And they would be gone with the wind. It is not difficult to guess why, these cookies are full of goodness in each bite! Fluffy, melting, dreamy moments with a cup of tea or coffee, or even milk if you like to. These cookies are originally from Sweden are called "Drömmar" which means "Dreams" in swedish. The baking ammonia makes the cookies crack open and gives the airy holes inside. I found them for the first time in the baking book "Gyldendals Store Bakebok" which I borrowed from the library, and believe I have been borrowing this book all the time after that. It is a book full of gold worth recipes and I tend to keep the book for as long as I am allowed, about 3 months for each time. I tried to search for that baking book on the net, but it is not sold anywhere, I guess because it is old. However, I got a mini renewed version of that book, I ordered it online from Sweden, and I thought it was the same book as I was looking for, but it is different. Although it contains many of the recipes from that old book, among them this original recipe of Dreams Cookies!


I guess you want the recipe now? Well I would not let you wait anymore. I am sharing here recipe of definitely one of the best cookies ever and one my best classic recipes ever! A little time consuming at the beginning, but it is so worth it. You would not regret. And while you are are at it, why not make a huge batch?


Makes about 50 cookies

I n g r e d i e n t s

100 g butter or margarine, softened
3 dl sugar
2 tsp vanilla sugar
1 dl oil (with neutralt taste, corn oil recommended)
1 tsp baking ammonia
ca 4 dl all-purpose flour


1. Beat butter, sugar and vanilla sugar smoothly with el-mizer or by a wooden spoon
2. Add the oil, little at a time and beat well each time, until it becomes silky and smooth (this stage is time consuming and I reccomend using hands at this stage, it gives better result)
3. Mix the baking ammonia with a little of the flour and add in the batter
4. Work in the remaining flour (still using your hands) until it is not sticky
5. Roll the dough in two lenghts, cut in pieces (25 each length) and form to balls
6. Put the balls on a greased or baking sheet covered baking tray
7. Press a half, scalded and peeled almond on each cookie if you like

Bake in a moderately hot oven at 150C for about 20 minutes in the middle of oven


Note! The baking ammonia can not be substituted since it gives these cookies their characteristic crack open look and the airy holes inside. While the cookies are baking you will smell baking ammonia all over the kitchen, it is not dangerous, the smell will disappear once the cookies are baked. These cookies should not be over-baked, they are supposed to keep their pale color and should not be turned golden at all!

11 Oct 2010

Crunchy Chocolate Chip Cookies


What would be a better give-away gift to a friend than half-a-dozen of lovely chewy, crunchy munchy choco chip cookies? I made a batch today of these cookies following a recipe I found on Allrecipes. I did a huge search on google and in the jungle of recipes it was way too difficult to sort out the best ones. This recipe from Allrecipes had good reviews and I decided to give they a go. I only made a half batch of the recipe and did cut the chocolate chips to another half quantity and I do not think there are needed more of these, or else they would turn out too sweet. I mixed three different types of chocolate, dark chocolate, dark swiss chocolate with honey and nougat and white chocolate. The dough was just too delicious and I could not stop myself stealing from it. The dough is supposed to rest for 24-36 hours in fridge for best result, not having much time I rested it for about 5 hours. The creamy dough had turned into hard consistency which I formed as balls with my hands and baked for about 20 minutes. I think I baked them a little too much since they turned more crunchy and crispy than chewy. However, I can not complaint on the taste, these cookies were delicious with a glass of caffe latte. I think I will try to bake them less next time.


Mmmm. Bits of chocolate in every bite. Cold outside. And a large cup of real bitter coffee. Perfect.


And a give-away ofcourse! A nice box and some lovely silk ribbon and there you got one of the best gifts ever. I am bringing these for my friend tomorrow, hope she will like them.


Makes about 18 medium-sized cookies
Calories each cookie: ~ 125

I n g r e d i e n t s

85 g butter, softened or melted
100 g brown sugar
50 g sugar
1/2 egg
1/2 egg yolk
1 tsp vanilla essence
125 g all-purpose flour
1/2 tsp baking soda
75 g chocolate chips (flavor as desired)


1. Cream together softened or melted butter with brown sugar and sugar until well combined
2. Add vanilla essence, egg and egg yolk, mix until light and creamy
3. Sift together flour and baking soda, add in the mixture and stir until just combined
4. Add chopped chocolate chips or chocolate morsels with a wooden spatula
5. Chill in the fridge for atleast one hour
6. Form balls with hands or use a spoon to form balls and set them about 5-8 cam apart on a baking sheet


Bake on 150C for about 15 minutes until golden brown on edges in the middle of oven

Note! Let the cookies rest on the baking sheet for 5-10 minutes after taking them out as they continue to bake on the tray

8 Oct 2010

American Chocolate Muffins


I l
ove everything chocolatey. Muffins are no exception. After trying some different recipes for american muffins, I finally found one that is worth sharing. This recipe comes from the swedish webpage Dagens Muffin and is on the top of the voting list. I can understand why. These muffins turns out very tender and moist and not too sweet, and they raise a lot while baking. The recipe is very easy to follow, done in two steps only. This recipe is recommended by me.

Note! The actual recipe calls for one whole dl of cocoa powder and I think that is way too much, so I cutted it down to 30 g, which is more than enough.


Makes about 12 large (american forms) or about 25 small

I n g r e d i e n t s

4 dl all-purpose flour
1 3/4 dl sugar
4 tsp baking powder
2 tsp vanilla sugar
2 pinch salt
30 g cocoa powder
1 egg
3 dl milk
1 dl oil
175 g dark or light chocolate, chopped
(50 - 100 g nuts and fruits - optional)
                                                                              

1. Combine flour, sugar, baking powder, vanilla sugar, salt and cocoa powder
2. Stir and combine well
3. Whisk egg, milk and oil with an el-mixer for about 1 minute
4. Stir the dry ingredients in the egg batter until a smooth mixture (do not over mix)
5. Pour the batter in small or large muffin forms a little more than 1/2 of the form
6. Put chunks of chopped chocolate (nuts and fruits) on the muffins and push them a little down in the batter


Bake in a moderately hot oven at 175C for about 20-25 minutes (15 minutes if using small forms) at the middle of oven


Katharine Hepburn's Brownies - Testing Recipe


So yeah, as I told in my last post I was craving for some really good brownies and after a search on google the famous Katharine Hepburn's brownies catched my attention and I gave it a go. The recipe I used is from the website Joyofbaking and I checked different recipes on google and all were the same for these brownies. This recipe had alot of good reviews so I thought they have to turn out amazing. First thing I actually got a bit skeptical to was the really huge amount of sugar, 200 grams! And the too little amount of flour, lousy 30 grams. What would that turn into? A sugary jelly type of brownies. Anyways, I did put 10-15 grams extra of flour and the batter was yummy yummy really. The result you may ask, well I am not really satisfied, it actually turned into a sugary jelly which was not chewy at all. They were way too sweet so I dropped the icing sugar on top and my sis could tell the same that our old brownies recipe is better. To be honest I am a bit skeptical to the brownies recipe which are made by melting chocolate and butter, no success to me as I have tried it before. I think my old recipe for Real American Brownies with cocoa powder is if not really good, far better than this one. By the way, I can not get those brownies I had on the cafe last week out of my mind. They were just perfect! And my search for those perfect brownies will go on. I shall try a new recipe for brownies everytime till I find the right one. If anyone have an extemely good brownies recipe, please share so that I can try it out. Will I make these again? Never. But maybe any of you out there would like them, so I am sharing the recipe - The recipe can be found here.


They were really easy to make and I did not use the mixer. The batter was so yummy that I licked the whole bowl with my finger haha. Just if the baked version would turn that good. Licking the bowl of any cake batter is my favorite part of baking!


The texture of the brownies was very jelly-like and the top flaky, but they got a little better after some hours. The only part that would be chewy was the corners. 


1 Oct 2010

Decorated Sugar Cookies ~ The Daring Baker's Challenge, Sep 2010


1st October. It has gone a while since I posted here. Well, there have been alot of things to do and I have been quite busy decorating my bedroom. Now as operation bedroom is completed [amazing result], I am ready for my blog again and there are alot of photos and recipes in my database that I can not wait to share. 


As for now, this post is dedicated to the daring baker's challenge, September 2010. This is my second challenge since I joined the group, but my first challenge to participate in. Last month's challenge was all about getting creative and create amazingly decorated cookies which could be great giveaways and gifts. I did the cookies one day before deadline and I was not really prepared and in the most creative corner that day. The cookies turned out good in taste, but I should have baked them a few minutes more. As for the decorating I have was quite empty of ideas and could not think of what else September would mean to me other than fall. And I do not have a good variety when it comes to cookie cutters, only have the standard ones, so I used the tree cookie cutter as leaves and they did not turn out pretty at all. Horrible colors! Rest of the cookies were alot better, but I can not understand where the wedding inspired cookies fits in the month of September. The recipes for the sugar cookies and royal icing for this challenge are adapted from the daring kitchen.
I guess I am far more creative and experienced when it comes to decorating cakes. Decorated cookies are not really my piece of cake. I hope I will do better in this month's challenge.


Basic Sugar Cookies (recipe adapted from the daring kitchen)


I n g r e d i e n t s

Makes Approximately 36x 10cm / 4" Cookies

200g / 7oz / ½ cup + 6 Tbsp Unsalted Butter, at room temperature
400g / 14oz / 3 cups + 3 Tbsp All Purpose / Plain Flour
200g / 7oz / 1 cup Caster Sugar / Superfine Sugar
1 Large Egg, lightly beaten
5ml / 1 tsp Vanilla Extract / Or seeds from 1 vanilla bean


Directions
• Cream together the butter, sugar and any flavourings you’re using. Beat until just becoming
creamy in texture.
• Tip: Don’t over mix otherwise you’ll incorporate too much air and the cookies will spread during

baking, losing their shape.

• Beat in the egg until well combined, make sure to scrape down the sides of the bowl.
Add the sifted flour and mix on low until a non sticky dough forms.
• Tip: I don’t have a stand mixer so I find it easier to switch to dough hooks at this stage to avoid

flour flying everywhere.

• Knead into a ball and divide into 2 or 3 pieces.
• Roll out each portion between parchment paper to a thickness of about 5mm/1/5 inch (0.2 inch)
• Refrigerate for a minimum of 30mins.
• Tip: Recipes commonly just wrap the whole ball of dough in clingwrap and then refrigerate it for an

hour or overnight, but by rolling the dough between parchment, this shortens the chilling time and
then it’s also been rolled out while still soft making it easier and quicker.

• Once chilled, peel off parchment and place dough on a lightly floured surface.
• Cut out shapes with cookie cutters or a sharp knife.
• Arrange shapes on parchment lined baking sheets and refrigerate for another 30mins to an hour.
 Tip: It’s very important you chill them again otherwise they’ll spread while baking.
• Re-roll scraps and follow the above process until all scraps are used up.
• Preheat oven to 180°C (160°C Fan Assisted) / 350°F / Gas Mark 4.
• Bake until golden around the edges, about 8-15mins depending on the size of the cookies.
• Tip: Bake same sized cookies together otherwise mixing smaller with larger cookies could result in

some cookies being baked before others are done.

• Tip: Rotate baking sheets half way through baking if your oven bakes unevenly.
• Leave to cool on cooling racks.
• Once completely cooled, decorate as desired.
• Tip: If wrapped in tinfoil/cling wrap or kept in airtight containers in a cool place, un-decorated

cookies can last up to a month.


Royal Icing:
315g – 375g / 11oz – 13oz / 2½ - 3 cups Icing / Confectioner’s / Powdered Sugar, unsifted
2 Large Egg Whites
10ml / 2 tsp Lemon Juice
5ml / 1 tsp Almond Extract, optional

Directions
• Beat egg whites with lemon juice until combined.
• 
Tip: It’s important that the bowls/spoons/spatulas and beaters you use are thoroughly cleaned and
grease free.

• Sift the icing sugar to remove lumps and add it to the egg whites.
• 
Tip: I’ve listed 2 amounts of icing sugar, the lesser amount is good for a flooding consistency, and the larger amount is for outlining, but you can add even more for a much thicker consistency good for writing. If you add too much icing sugar or would like to make a thinner consistency, add very small amounts of water, a few drops at a time, until you reach the consistency you need.
• Beat on low until combined and smooth.
• Use immediately or keep in an airtight container.
• 
Tip: Royal Icing starts to harden as soon as it’s in contact with air so make sure to cover containers with plastic wrap while not in use.